Today it is about the creation of a first Azure account, the Azure Free Account. In one of my last presentations, I was asked, or at our meetups, I am regularly asked what you have to do when creating the Azure Free Account, so here is a little guide. With this little guide, I would like to show you which steps are necessary and which information is requested. So, let’s start by explaining what this Azure Free Account is all about …
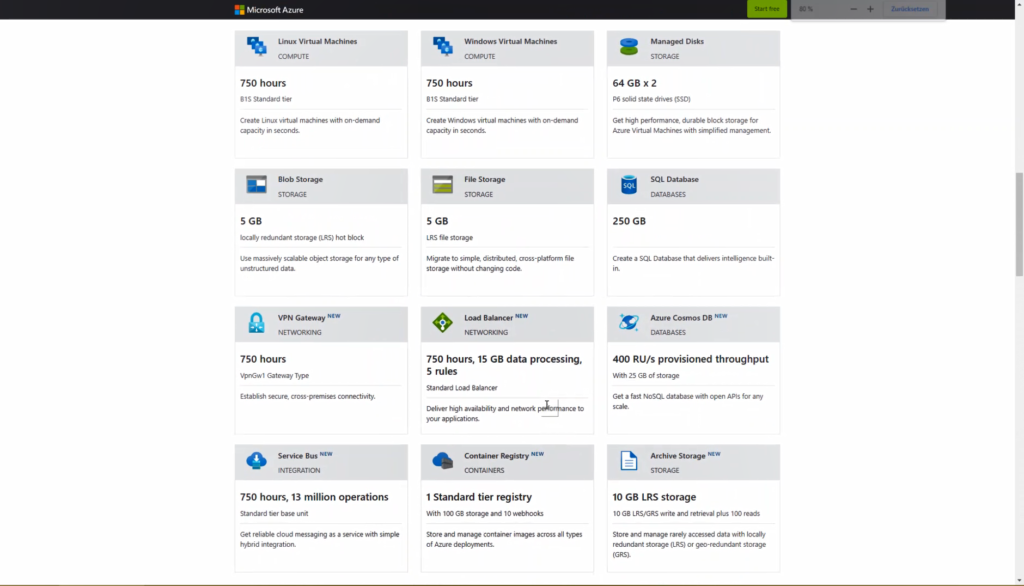
What is included in your Azure Free Account?
Keep it short and simple – you’ll get a lot 😉
- 200 USD aka 170 Euro for 30 days
- every service you want to test from the complete range of available services in Azure!
- 12 months of popular free services like
- 1x Linux Virtual Machine (B1S) – monthly 750 hours
- 1x Windows Virtual Machine (B1S) – monthly 750 hours
- 2x Managed Disks 64GB – P6 SSDs
- 5GB LRS – Blob Storage
- 5GB LRS – File Storage
- 1x Azure SQL Database – 250GB Data (S0 = 10DTU or S1 = 20DTU)
- 1x Azure Cosmos DB – 25GB Data (400RU/s)
- 1x Azure Container Registry (Standard Tier)
- a whole bunch of Cognitive Services like Face Recognition, Anomaly Detector etc
- Always free
- 10 Web-, Mobile- or API-Apps
- 1.000.000 Azure Functions requests
- Azure Kubernetes Services (AKS)
- Azure DevOps (5 users)
- Azure Data Factory (5 low-frequency activities)
- just to name some of them
You can get a full list of those included services => https://azure.microsoft.com/en-us/free/
Let us start to create your Microsoft Account
You should have at least or how Microsoft names it, what you need to sign up:
- an active Phone Number
- a credit card
- and a Github or Microsoft Account Username (earlier known as Live Account)
If you don’t have such an account you might register one during the process… I also started with a new non-Microsoft mail address which I created for such demos.
On the top of the page, you’ll find a button “Start free” – click it 😉
You’ll be redirected to a login page – if you have a Microsoft Account you might use it here, or you want to use your Github account you have to click at the bottom. If you – like me – want to use a new mail address then you have to start with the”Create one!”-link.
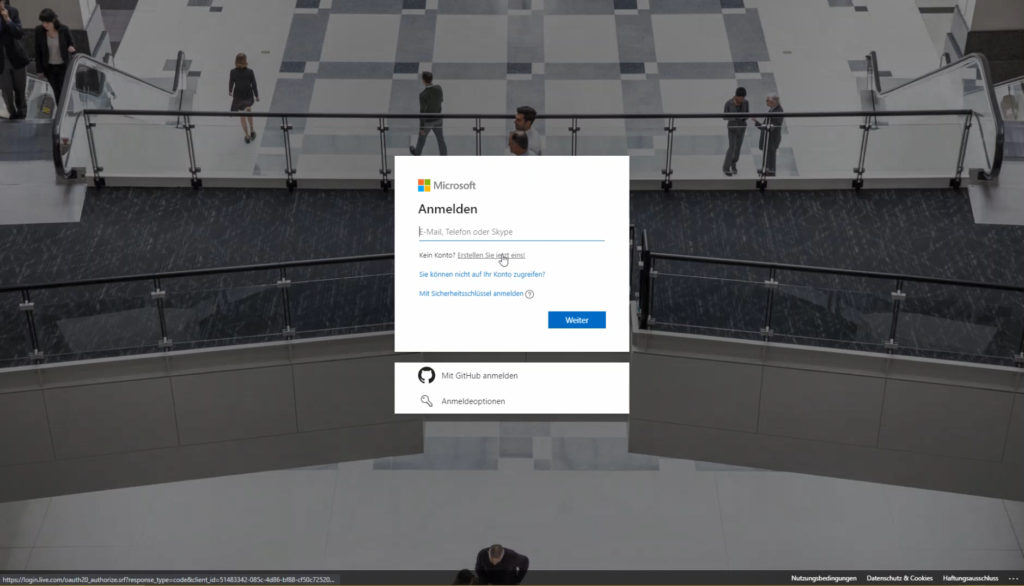
Type in your mail address and new password, then Microsoft sends you an email to that given mail address in order to vailidate that you are the one and the account is excisting. With that email you’ll receive a code which should be entered on the webpage. (you might be interested in receiving informations from Microsoft – please check the box to get those). After entering the code you need to prove that your are not a robot and have to solve a little riddle – mine was to move a picture clockwise until it is in the correct position and provide your birthday and country/region.

Azure Free Account – Enter your password 
Azure Free Account – Enter the vailidation code 
Azure Free Account – Solve the riddle 
Azure Free Account – Enter birthday and location
Now it is time for your first Azure subscription
After creating your Microsoft account we can proceed with connecting this fresh account with your new Azure subscription (a subscription here is a logical header for all your resources – I’ll explain in another blog post.) In this step of your sign in you’ll have to provide a valid credit card and active phone number. Let me explain why this…
- Credit Card
is needed for verification that you are old enough (according to the country you come from) and if you might want to change to “Pay-As-You-Go” after your budget is over, then you’re already prepared. - PhoneNumber
also for verification that you are a person and not a robot entering data - a Microsoft account
this is the user with will be registered as your “Global Admin” of your Azure subscription, you have to use it regularly during login if you are not using different accounts for different requests.

Entering your profile data 
Verification with your Phone 
Checking your Creditcard 
Done !!!
If you have any questions, don’t hesitate to ask me or eventually you will find answers to any offered service within your Azure Free Account => FAQ
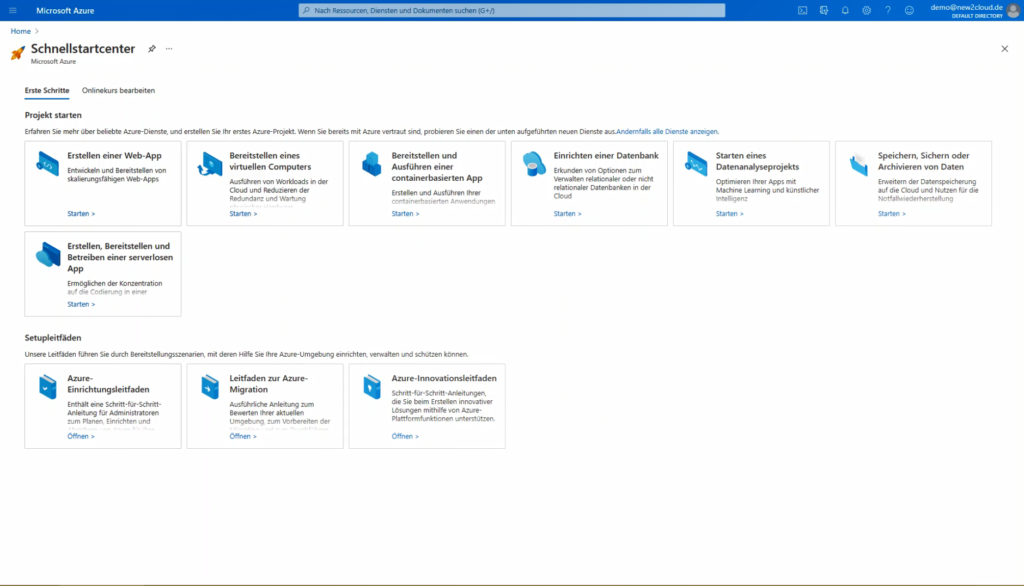
In the last image you can see a blue button in the upper left area “Build in the portal” – this is where all the fun for the next weeks will happen – in the Azure portal where you deploy all those great services and administer all your services.
Microsoft offers a lot of easy Step-by-Step scenarios like “Develop and deploy your first scalable Web-App” or “Deploy and Execute a container-based application”
ENJOY and have fun.
[…] scalability, security, and robustness to ensure that your data is always available when needed. Microsoft Azure has been used by large and small companies for years, proving itself a reliable […]